How To Simulate GPS Movement in iOS
Be warned: doing this on Pokemon Go might get your account suspended for cheating.
Motivation
Since the release of Pokemon Go, the world has went insane catching those cute monsters. Myself included. Its all fun and games until you realize that if you live in the rural area, there’s not much that you can do.
I live 25km away from Melbourne CBD and there are two Pokestops within 5km of my house. Compare this to the CBD where there are hundreds of Pokestops and Gym everywhere. It’s ridiculous.
How about needing to walk 10km to hatch one Poke egg? I understand that it is good to have a walk around, but in the cold rainy winter day, I’d prefer to stay home.
There must be a better way to enjoy this game than driving 25km to city just to play. Right?
Solution
We are going to use the Xcode debugger to simulate GPS location and catch all the Pokemon!
Preparation
– very basic iOS development experience
– Mac machine with Xcode installed (it’s free)
– iPhone with Pokemon Go installed
– Apple developer account to run app on your phone
– text editor with regex find and replace function, such as Sublime Text
Steps
– draw the map that your trainer will walk through
– process the map file into .gpx file that Xcode will accept with regex
– create iPhone app that will be used to inject the .gpx file
– catch ‘em all!
Now let’s get started
Drawing the map
Lets visit this website first: GPSies track creator
Then put 3 in Speed (mph) field to simulate average walking speed. If you wanted to test the limit, I’ve tried 6 mph and it still counts for hatching eggs.
After that, search for the big city that you wanted to catch your Pokemon in. In my case, I entered Melbourne

Zoom in until you can see the roads clearly and you can start clicking to draw waypoints. I’d recommend to draw around 5-10km worth of waypoints to reduce repetition and looping. The longer the better.
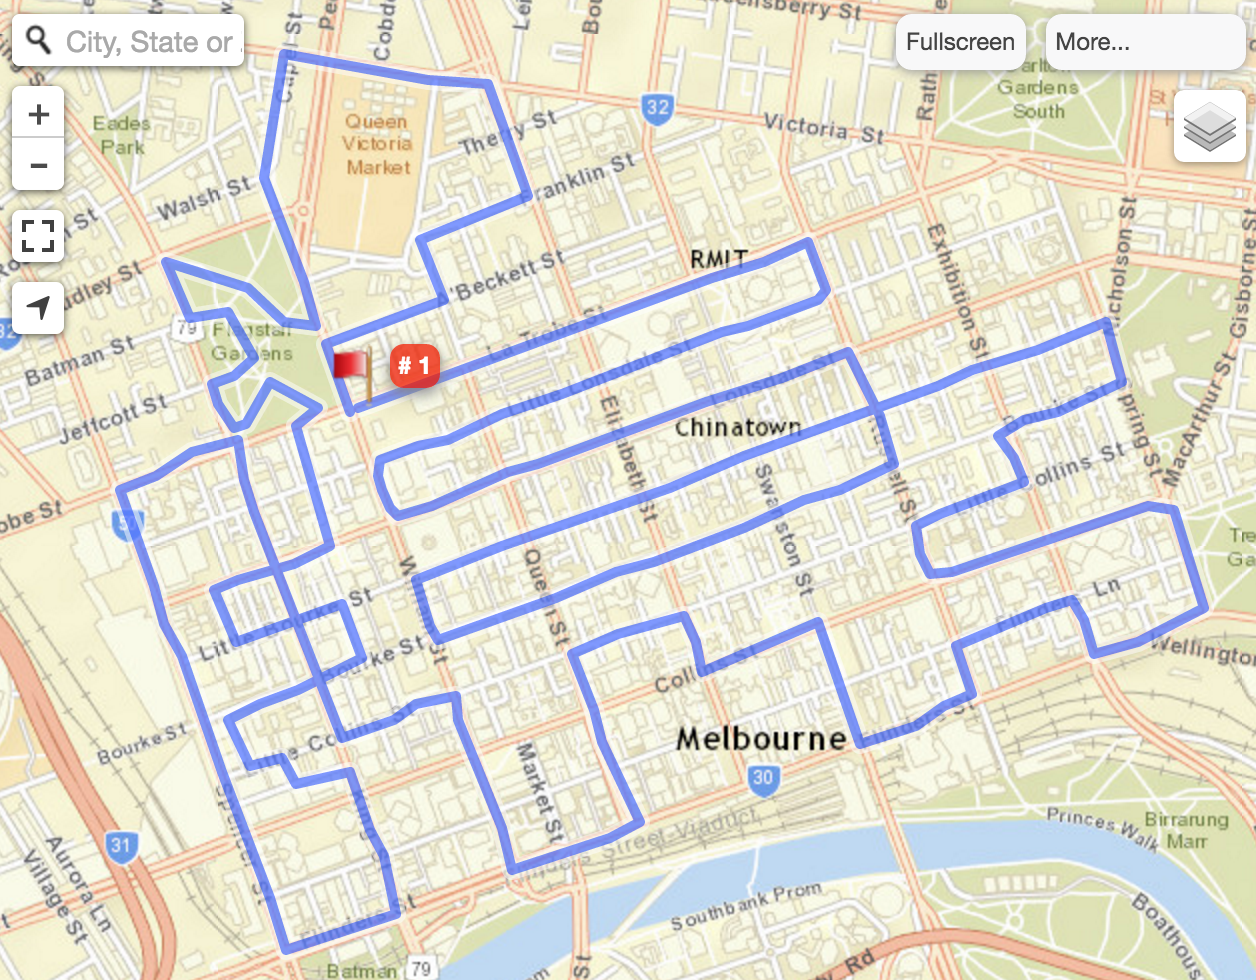
This is my track:
After we are done with drawing tracks, scroll down and find the Export file section and press download

Congrats, you have done drawing your map and exporting it!
Processing the gpx file
Now open the .gpx file that just been downloaded with Sublime Text. It should look like this:
<?xml version="1.0" encoding="UTF-8"?>
<gpx xmlns="http://www.topografix.com/GPX/1/1" xmlns:gpsies="http://www.gpsies.com/GPX/1/0" creator="GPSies http://www.gpsies.com - GPSies Track" version="1.1" xmlns:xsi="http://www.w3.org/2001/XMLSchema-instance" xsi:schemaLocation="http://www.topografix.com/GPX/1/1 http://www.topografix.com/GPX/1/1/gpx.xsd http://www.gpsies.com/GPX/1/0 http://www.gpsies.com/gpsies.xsd">
  <metadata>
    <name>GPSies Track</name>
    <link href="http://www.gpsies.com/">
      <text>GPSies Track on GPSies.com</text>
    </link>
    <time>2016-07-10T05:47:48Z</time>
  </metadata>
  <trk>
    <name>GPSies Track on GPSies.com</name>
      <trkseg>
        <trkpt lat="-37.8117843" lon="144.9566173">
          <ele>62.000000</ele>
          <time>2010-01-01T00:00:00Z</time>
        </trkpt>
          ...
        <trkpt lat="-37.8118521" lon="144.9564456">
          <ele>59.000000</ele>
          <time>2010-01-01T03:27:06Z</time>
        </trkpt>
      </trkseg>
  </trk>
</gpx>
The problem is, we can’t just use the file like that. Xcode wouldn’t understand it. So lets get pumping!
First just replace all this part:
<gpx xmlns="http://www.topografix.com/GPX/1/1" xmlns:gpsies="http://www.gpsies.com/GPX/1/0" creator="GPSies http://www.gpsies.com - GPSies Track" version="1.1" xmlns:xsi="http://www.w3.org/2001/XMLSchema-instance" xsi:schemaLocation="http://www.topografix.com/GPX/1/1 http://www.topografix.com/GPX/1/1/gpx.xsd http://www.gpsies.com/GPX/1/0 http://www.gpsies.com/gpsies.xsd">
  <metadata>
    <name>GPSies Track</name>
    <link href="http://www.gpsies.com/">
      <text>GPSies Track on GPSies.com</text>
    </link>
    <time>2016-07-10T05:47:48Z</time>
  </metadata>
  <trk>
    <name>GPSies Track on GPSies.com</name>
    <trkseg>
With:
<gpx>
Then at the end of the file, just delete the lines:
    </trkseg>
  </trk>
You should have something like this now:
<?xml version="1.0" encoding="UTF-8"?>
<gpx>
  <trkpt lat="-37.8117843" lon="144.9566173">
    <ele>62.000000</ele>
    <time>2010-01-01T00:00:00Z</time>
  </trkpt>
  ...
  <trkpt lat="-37.8118521" lon="144.9564456">
    <ele>59.000000</ele>
    <time>2010-01-01T03:27:06Z</time>
  </trkpt>
</gpx>
That’s great! What follows is a bit tricky and not as straightforward. We will have to change the format of the data from this:
<trkpt lat="-37.8117843" lon="144.9566173">
  <ele>62.000000</ele>
  <time>2010-01-01T00:00:00Z</time>
</trkpt>
into this:
<wpt lat="-37.8117843" lon="144.9566173"><time>2010-01-01T00:00:00Z</time></wpt>
Doing them one by one is possible, but it takes a lot of time to say the least when you have hundreds of points. To make things simpler for us, let’s use Regular Expression or Regex. If you have never used Regex before, it is just a language rules that we can use to select, modify, extract or otherwise manipulate texts.
Now inside Sublime Text, open up the Find and Replace menu by pressing cmd+shift+f.
Click on the leftmost icon with a dot and asterisk symbol on it. There should be a popup saying Regular Expression when you hover over it.
Then in the Find field enter:
\s+<trkpt\s(.+)\n.+\n\s+(.+)\n.+
And in the Replace field enter:
\n<wpt $1$2</wpt>
You should have it looking like this:

Then just press Replace and OK when asked. Your waypoints should be transformed into Xcode readable file.
If you think what happened is totally ridiculous and looked like sorcery, you might be right. You can read the short explanation by going to Regex101, but I won’t go into details here. Regex is big topic by itself and there are many people smarter than me that has covered it in detail.
Your final gpx file should look like this:
<?xml version="1.0" encoding="UTF-8"?>
<gpx>
<wpt lat="-37.8114622" lon="144.9647283"><time>2010-01-01T00:00:00Z</time></wpt>
...
<wpt lat="-37.8116487" lon="144.9645996"><time>2010-01-01T01:19:44Z</time></wpt>
</gpx>
Now you are ready to make your injector app!
Location injection app
The purpose of this app is just to inject the gpx file and run in the background while we play Pokemon Go. Thus it must be:
– always be plugged in to the computer with Xcode
– as light as possible to take up less memory
– always run in the background
The first point is pretty easy.
Second point is also easy since we will just have one empty controller with nothing on it.
Now the third point is tricky. We can’t just run a new empty app as iOS will kill it after several minutes of no activity to save battery and memory. We have to force it to keep running by using this trick:
keep requesting location update in the background
With this two, I was able to keep the app running for several hours in the background while I play Pokemon Go.
Project Setup
Open Xcode and press cmd+shift+n to create a new project.
Choose the Single View Application to start with and enter a name for your app. You can put anything here as it doesn’t matter. For example I named it LocTest
After the project is created, we have to do several things:
Backgrounding Capabilities
Go to the capabilities tab and turn on Background Modes.
After that, turn on the Location checklist.
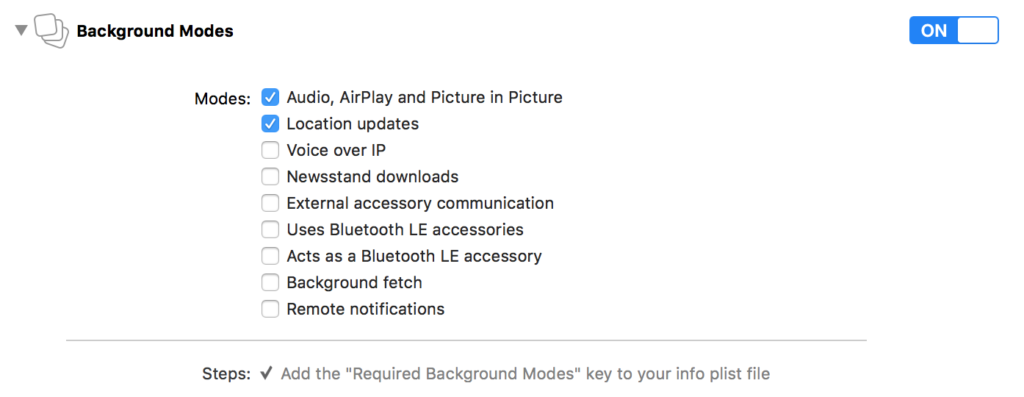
Info.plist
Open the Info.plist on the project navigator and add these two keys in the plist:

The first line enables the location permission prompt.
Second line just help your app to not get closed during backgrounding.
Import files
There are two files that we need. One is the processes gpx file that we did previously.
Drag and drop the two files into your project navigator and select the Copy items if needed box.
Codes to prevent backgrounding
Open AppDelegate.swift and below import UIKit:
import CoreLocation
Make the AppDelegate class conforms to CLLocationManagerDelegate protocol
class AppDelegate: UIResponder, UIApplicationDelegate, CLLocationManagerDelegate {
Add the locationManager property below the window property:
var window: UIWindow?
let locationManager = CLLocationManager()
Add this function into the class:
func location() {
  locationManager.delegate = self
  locationManager.allowsBackgroundLocationUpdates = true
  locationManager.desiredAccuracy = kCLLocationAccuracyBest
  locationManager.requestAlwaysAuthorization()
  locationManager.startUpdatingLocation()
}
Finally just call the function inside didFinishLaunching:
func application(application: UIApplication, didFinishLaunchingWithOptions launchOptions: [NSObject: AnyObject]?) -> Bool {
  location()
  return true
}
And the app is done!
Just launch it and you should see a white screen with a popup asking for location permission. Just tap on Allow.
If it doesn’t ask you for permission, just go to
Settings -> Privacy -> Location Services -> 'your app name' -> Always
There are better ways to debug this, but for the purpose of this tutorial, let’s just ignore the fact that we have a bug.
Injecting the location file
While the app is running, you should see the debugger console on the bottom half of Xcode. It looks like this:

If it’s not there, press cmd+shift+y to bring it up.
Click the arrow button and you should see your gpx file listed:
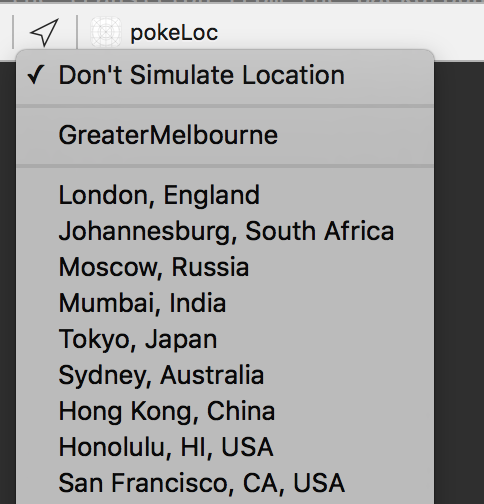
Click on it and your app is done!
Catch ‘em all
Now you can go to your iPhone and press home button to background the injector app. It should still be running in the background.
Open the Pokemon Go app and you should see your trainer walking around your pre-set path, passing through all the Pokestops and Pokemons!
I hope you enjoy the tutorial and let me know if you got any questions on the comment box below!
GPS error
Even though we have tried to make the app run in the background, sometimes iOS will still kill it after a long period of time. In my testing this is several hours. You will see an error in Xcode console that says:
Message from debugger: Terminated due to memory issue
Pokemon Go app will either:
– show GPS error
– reset your GPS to your real location
When that happens, just rerun the injector app and re-pick the gpx file. You will be good to go again!
I have not been able to find a more elegant solution that keeps iOS from killing the app. Let me know if you know a better way!
Summary
You have learned how to:
– create a map waypoint
– parse the gpx with regex
– create app that will stay active in the background by
– playing an empty mp3 file continuously
– continously updates location in the background
– cheat on Pokemon
Where to go from here?
– create another map path on beaches/port to catch that Magikarp (for Gyarados of course)
– use this technique to test (or cheat) all other GPS based apps
– write a comment in the box below 🙂
Thanks for reading yo!


